
Easy Cake Pops You Can Totally Customize (Yes, Even Rainbow!)
Save this one—it’s your new go-to for birthdays, showers, and “just because” parties.
There’s something about cake pops that makes people smile. Maybe it’s the bite-sized cuteness, or maybe it’s the fact that they look way harder to make than they actually are (your secret’s safe here). With this simple step-by-step recipe, you can make gorgeous, budget-friendly cake pops in any color you want—pink, blue, rainbow… you name it.
Perfect for baby showers, birthday parties, or just a weekend kitchen win with the kids, these cake pops are easy to customize and even easier to devour.
Why You’ll Love This Recipe
✨ So much cheaper (and better!) than store-bought
✨ Totally customizable—pink, blue, or rainbow
✨ Kid-friendly and fun to make together
✨ Make ahead & stash in the fridge
✨ Look impressive on a dessert table—no baking degree required
🛒 What You’ll Need
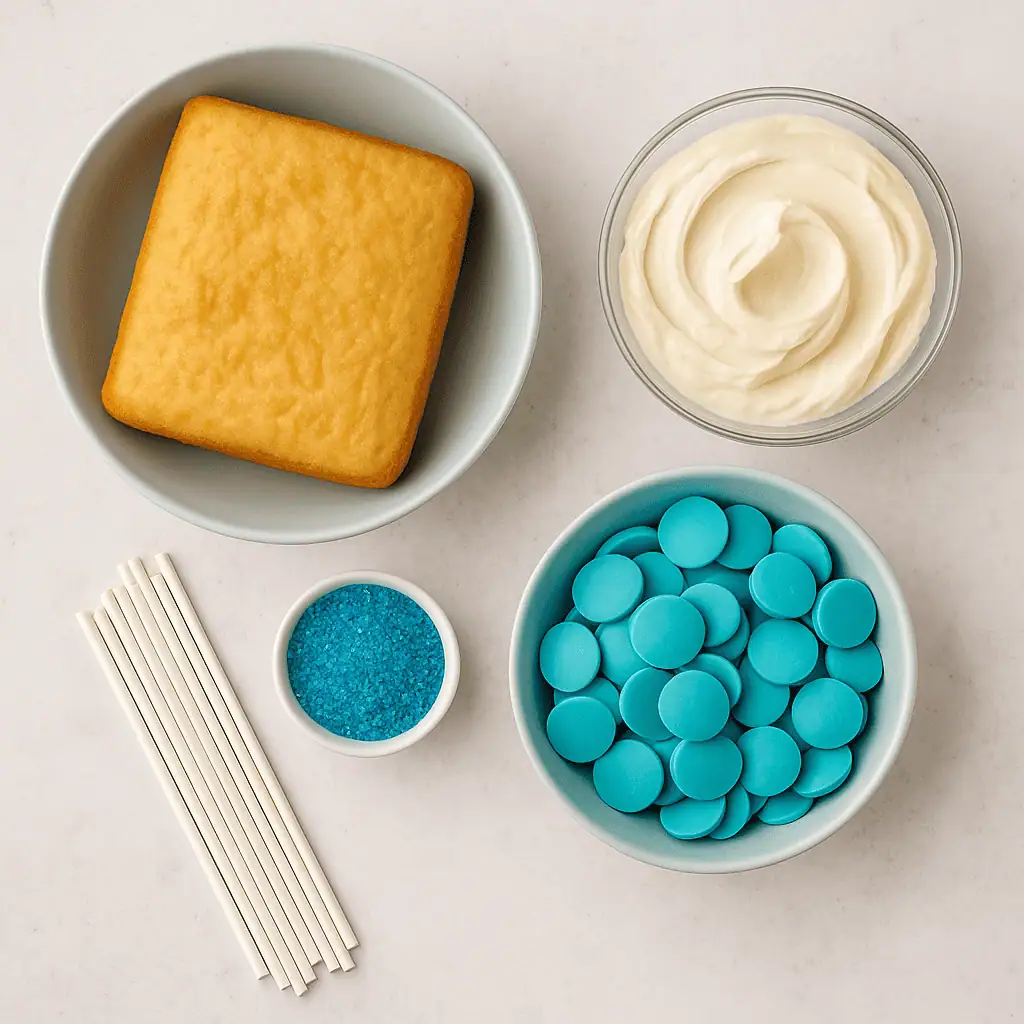
Ingredients
- 1 unfrosted 9×13 inch yellow or vanilla cake (boxed or homemade)
- 1 cup vanilla frosting
- 12 oz bag of candy melts (any color you like)
- 24 cake pop sticks
- Sanding sugar or sprinkles (optional)
Tools
- Cake pop sticks
- Large mixing bowl
- Spoon or spatula
- Baking sheet
- Microwave-safe bowl
- Parchment paper
👩🍳 How to Make Cake Pops (That Actually Stay on the Stick)
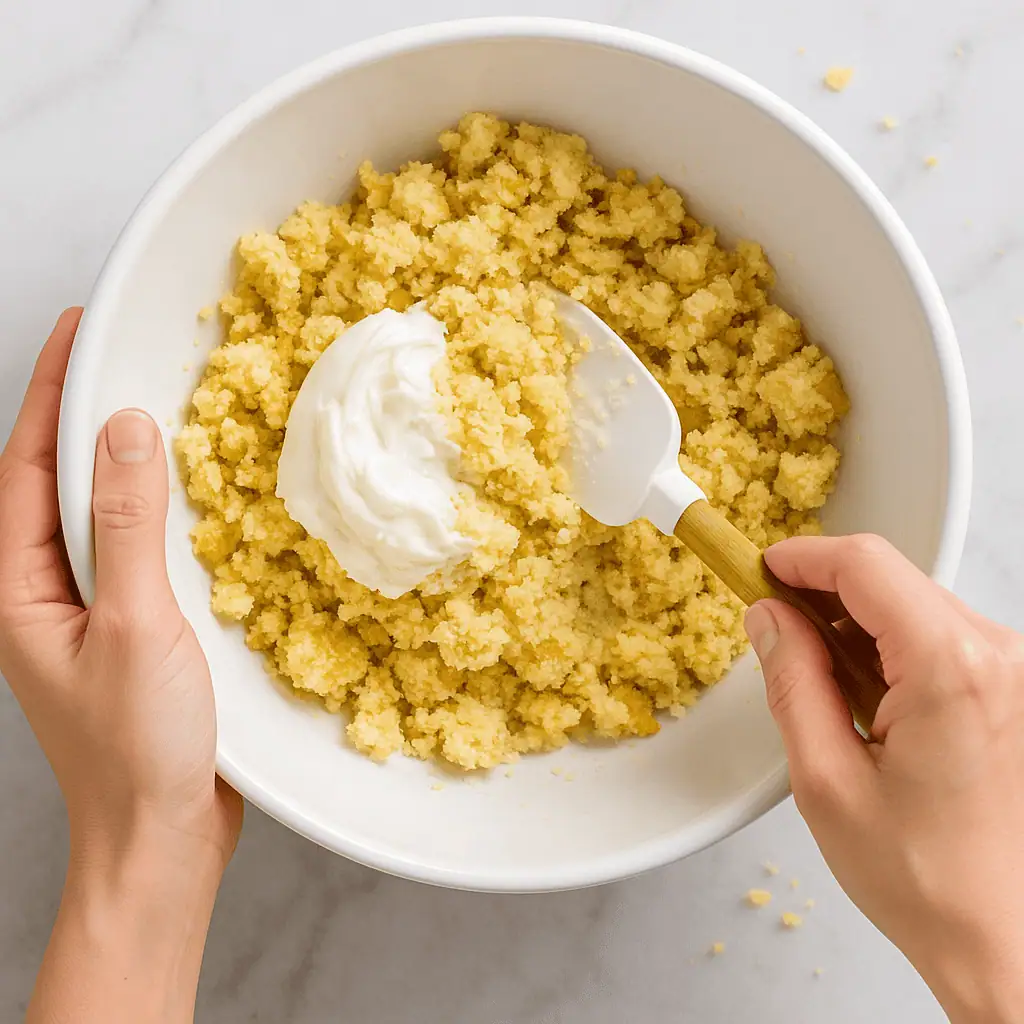
1️⃣ Crumble + Mix. Once your cake is completely cooled, break it into fine crumbs in a large bowl. Add frosting and mix until it holds together like dough.
2️⃣ Roll + Chill. Scoop and roll into 24 balls (about 2 inches each). Place on a parchment-lined tray and freeze for 20 minutes. Then give them a quick re-roll to smooth the edges.
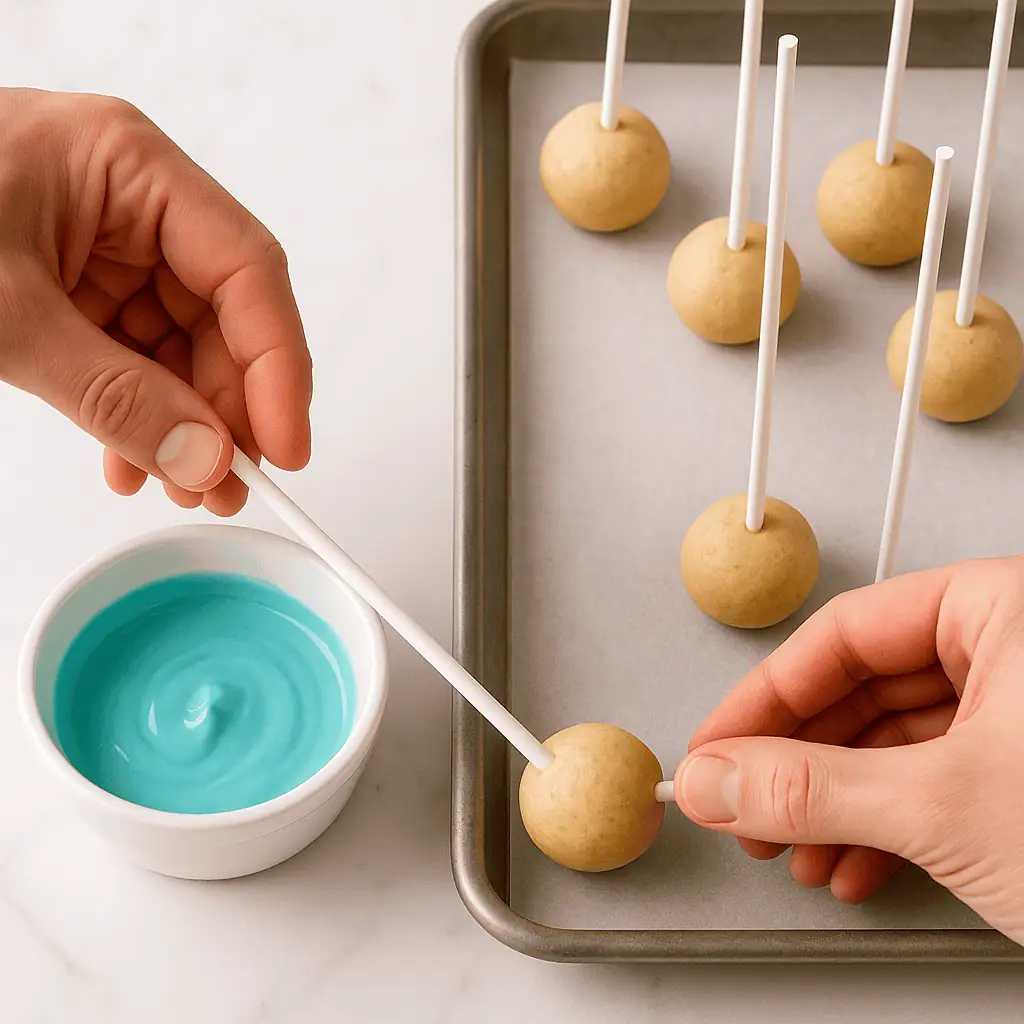
3️⃣ Stick + Chill Again. Melt ¼ cup of your candy melts. Dip one end of a cake pop stick ½ inch into the candy, then insert into a cake ball. Repeat for all. Chill for another 20 minutes to secure.
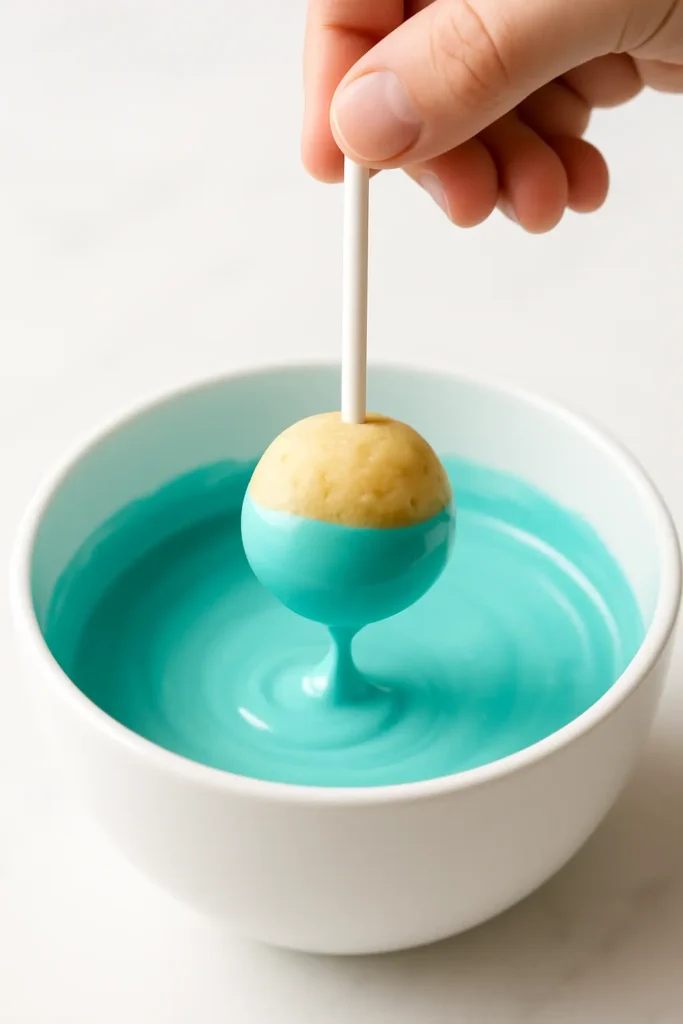
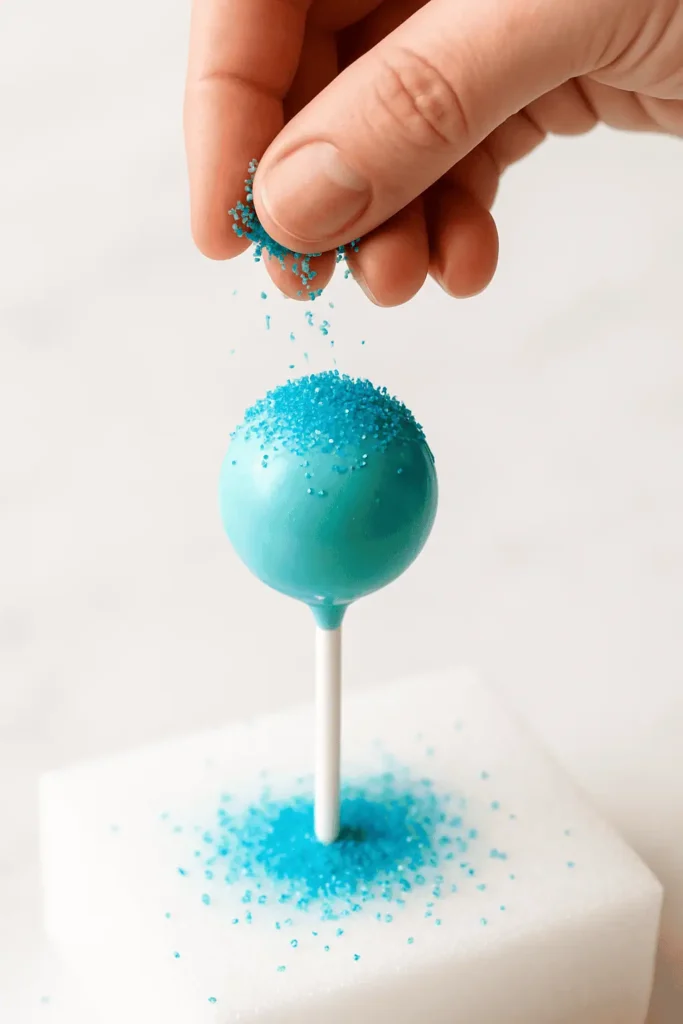
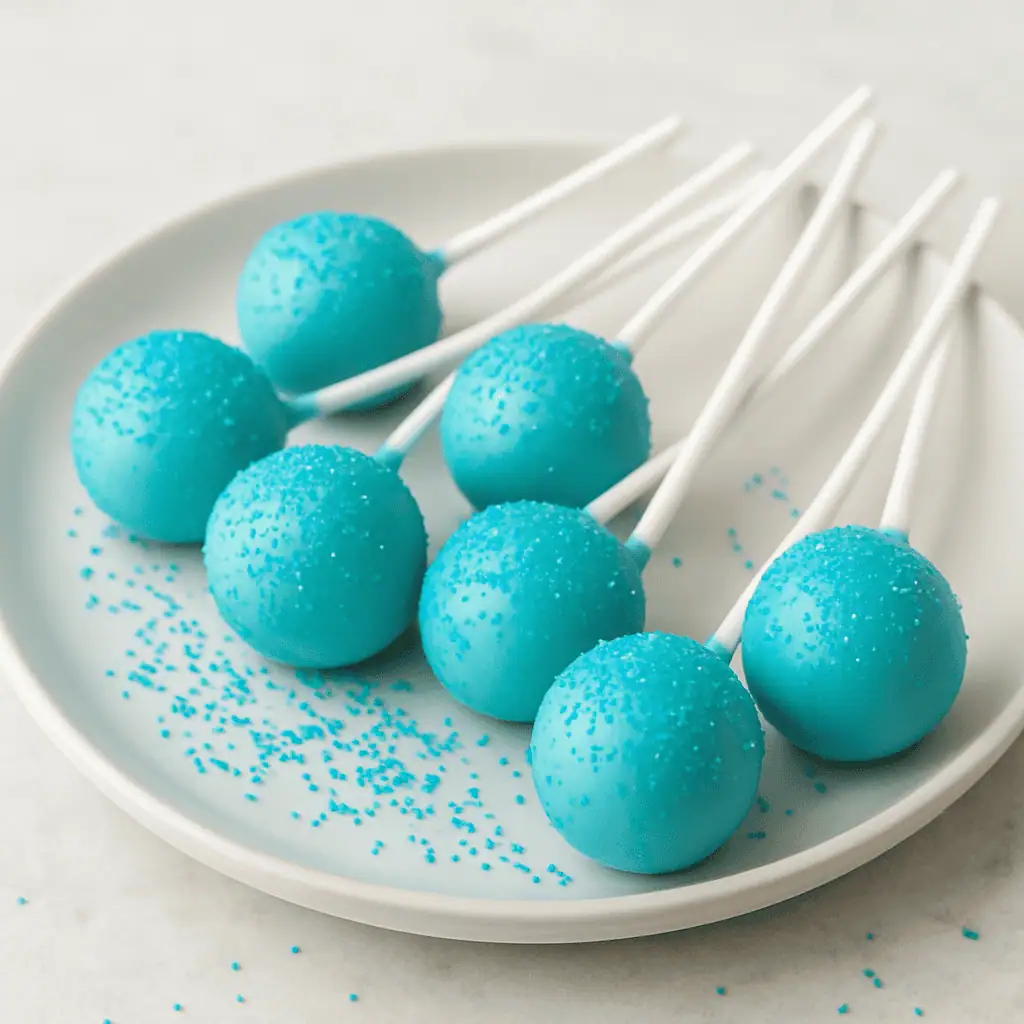
4️⃣ Dip + Decorate. Melt the remaining candy melts. Dip each pop fully and gently tap off the excess. Add sanding sugar or sprinkles before it sets.
5️⃣ Set + Serve. Refrigerate for 20 minutes until the coating is firm. Done!
💡 Pro Tips
- Use a cookie scoop for even sizing
- Work in small batches so the pops stay firm while dipping
- Let candy melts cool slightly before dipping to prevent cracks
- Want a clean, bakery-style finish? Use a foam block to dry them upright
- Store in the fridge for up to 5 days, or freeze (undipped) for up to 1 month
🎈 A Little Story Behind These Cake Pops…
I made my first batch of cake pops for my niece’s birthday—she wanted everything pink and sparkly, and I didn’t want to blow $50 on a dozen store-bought ones. I had leftover cake, frosting, and some dusty candy melts I’d been meaning to use… and magic happened.
We mixed, rolled, dipped, and sprinkled together—and while not every pop was perfect, every single one was adorable. She was thrilled. Her friends were obsessed. And I learned how easy (and satisfying) they are to make from scratch.
Now we try new colors and combos all the time. It’s become a little party tradition—and a lot of fun.
✨ Make It Your Own
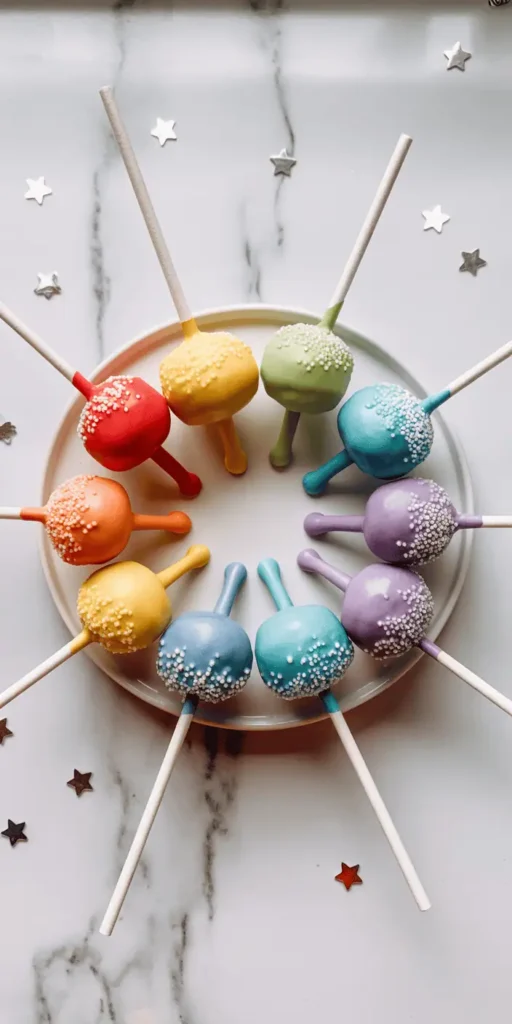
🌈 Want to Go Full Rainbow?
- Split your candy melts into 3–5 colors and dip in batches for a rainbow party vibe.
- Roll the cake balls in colorful sanding sugar after dipping for a magical effect.
- Add edible glitter or stars for extra sparkle.
Perfect for unicorn themes, birthdays, or Pride parties. Kids will love helping too!
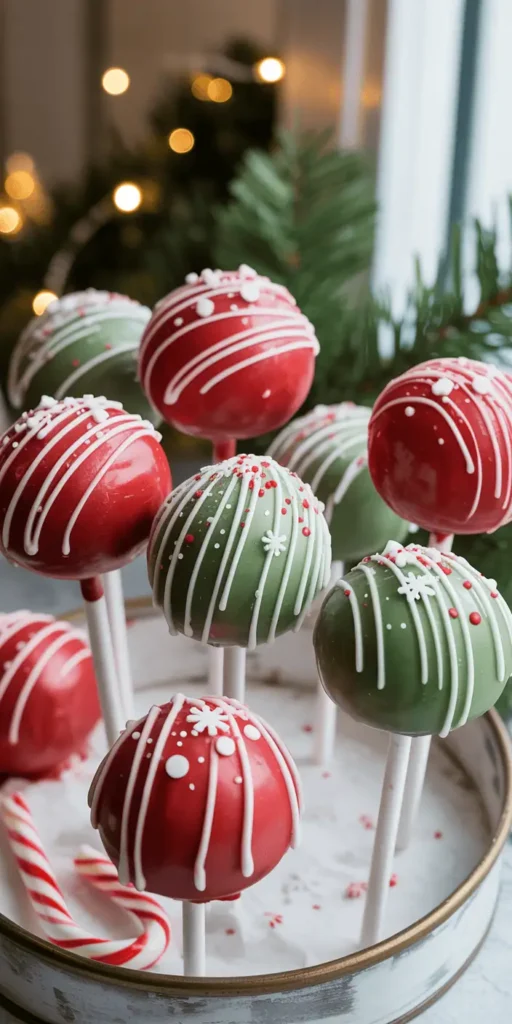
🎄 Make It Festive for Christmas!
- Use red and green candy melts or swirl both colors on one pop.
- Add crushed peppermint or snowflake sprinkles on top.
- Display on a holiday tray with mini candy canes for a cute edible centerpiece.
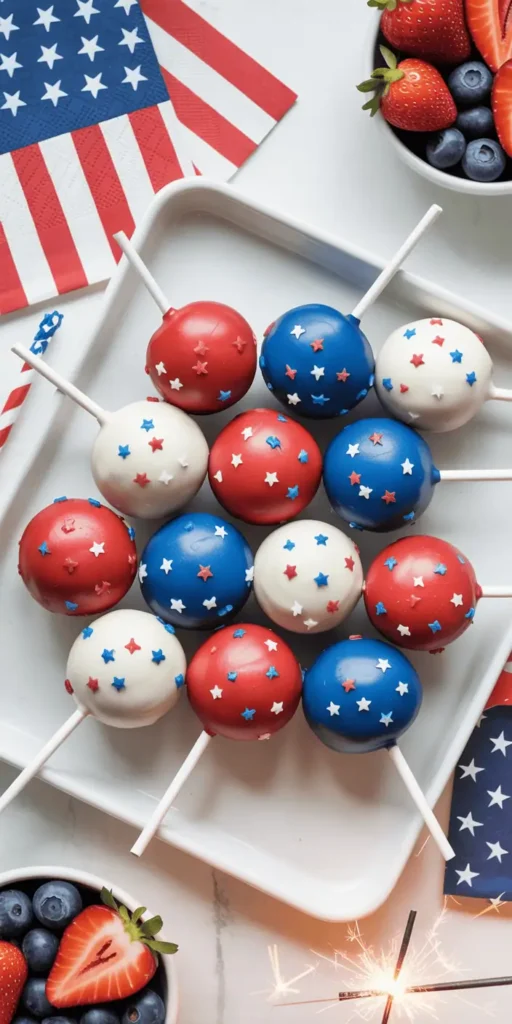
🎆 Make It Patriotic for the 4th of July!
- Use red, white, and blue melts to create layers or dip each pop in a different shade.
- Top with star sprinkles or edible glitter.
- Serve with fresh berries for a fun holiday dessert plate.
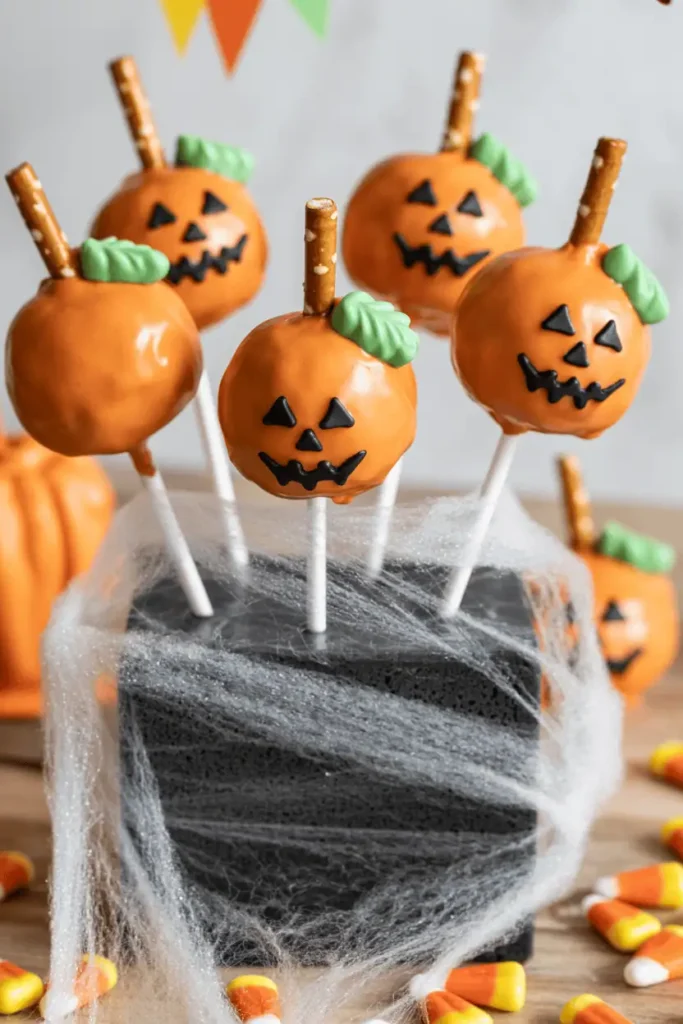
🎃 Make It Spooky for Halloween!
- Use candy melts in orange, black, purple, or slime-green for instant Halloween vibes.
- Roll freshly dipped pops in black sanding sugar or orange sprinkles for texture.
- Add candy eyeballs plus edible marker details (stitches, smiles, “RIP”).
- Create “stems” with mini pretzel pieces or green M&M’s for pumpkin pops.
- Finish with a drizzle of contrasting melts for that bakery-style look.
Perfect for school parties, trick-or-treat tables, or a spooky movie night at home.
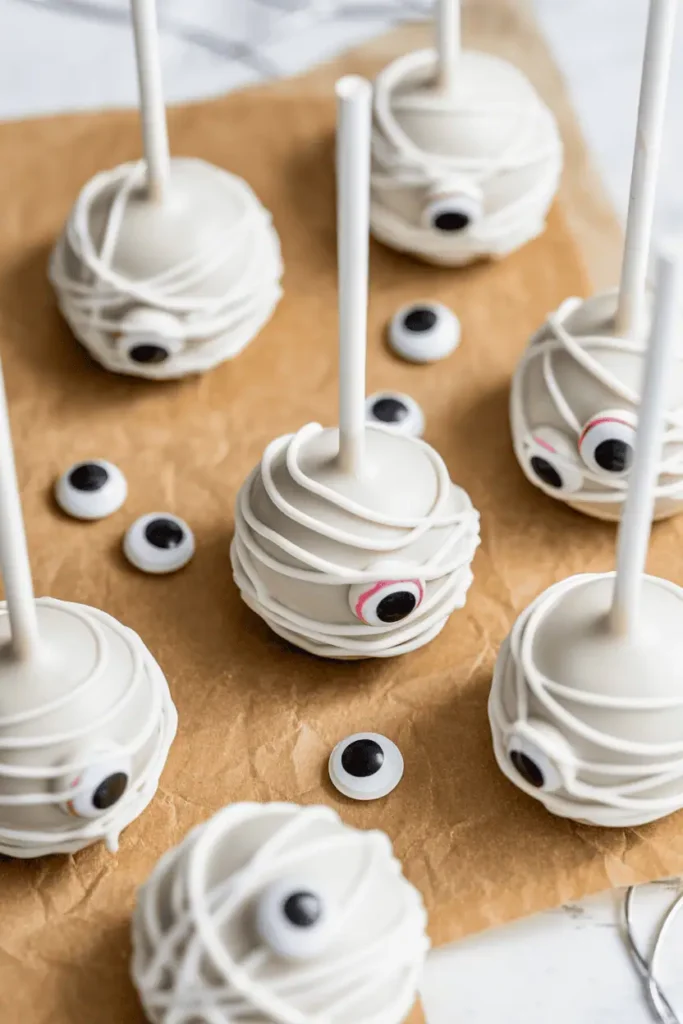
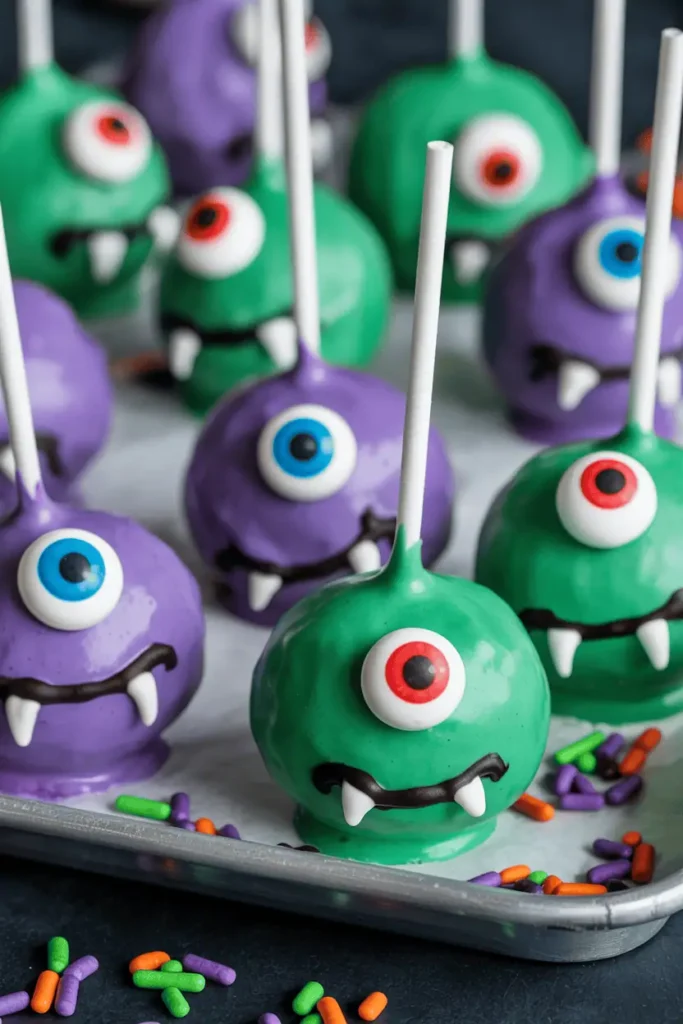
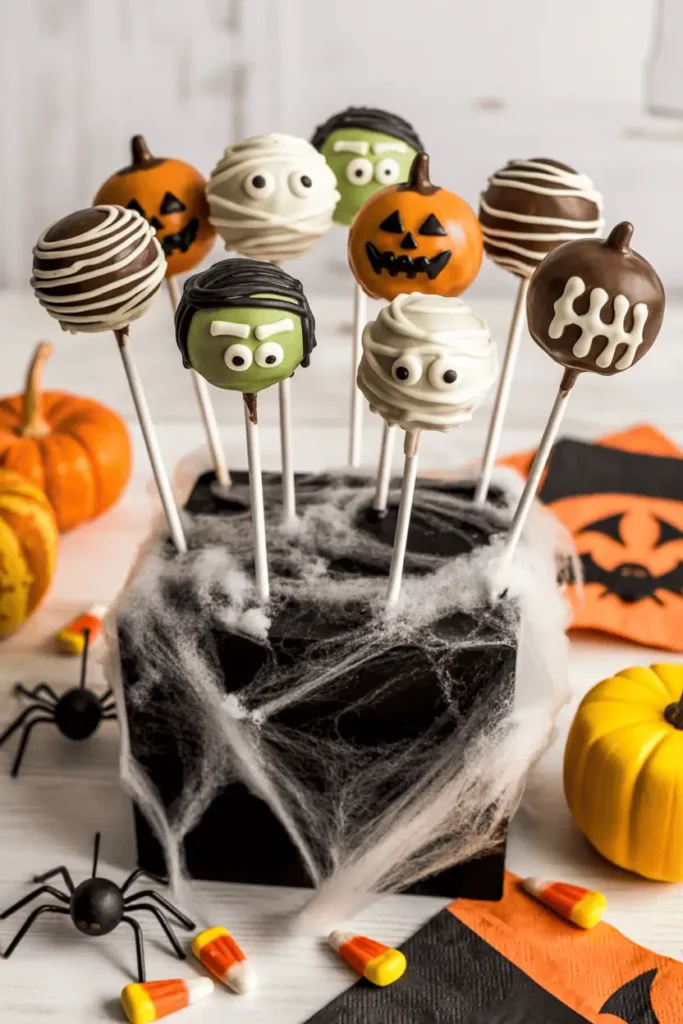
👻 Easy Character Ideas (No Fancy Tools)
- Mummy Pops: Dip in white melts, let set, then “bandage” with thin white drizzle. Add candy eyes.
- Pumpkin Pops: Dip in orange, add a pretzel stem + green sprinkle leaf. Draw jack-o’-lantern faces.
- Monster Pops: Dip in green or purple, add 1–3 candy eyes, pipe goofy mouths/scars with chocolate.
- Black Cat Pops: Dip in black melts, press on two chocolate chips for ears, add eyes/whiskers with gel.
Set out bowls of eyes, sprinkles, and markers—kids can decorate their own!
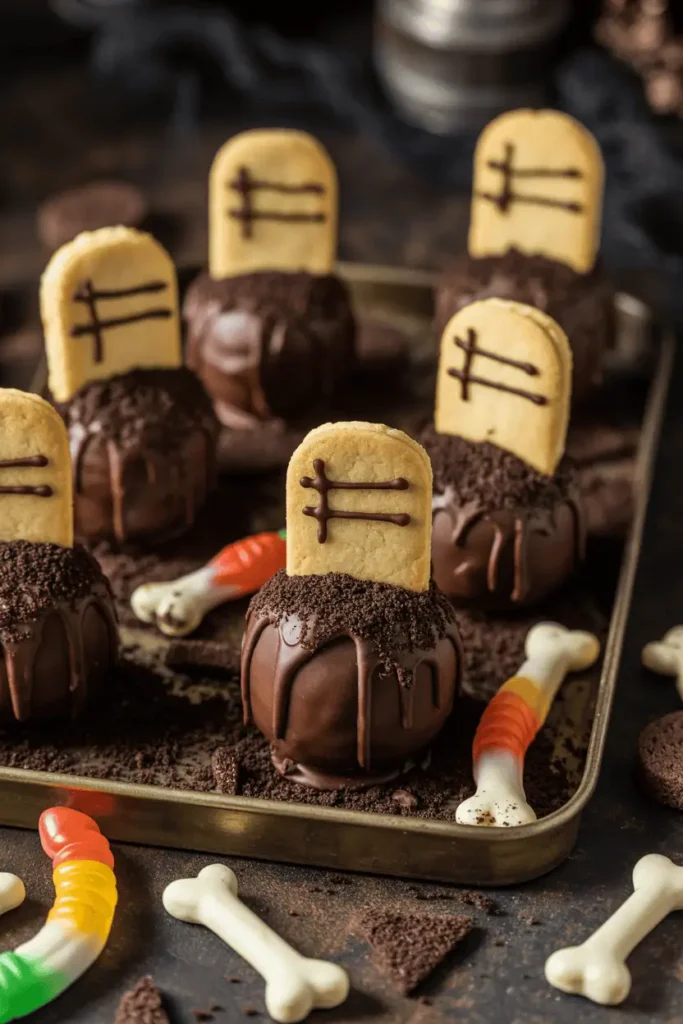
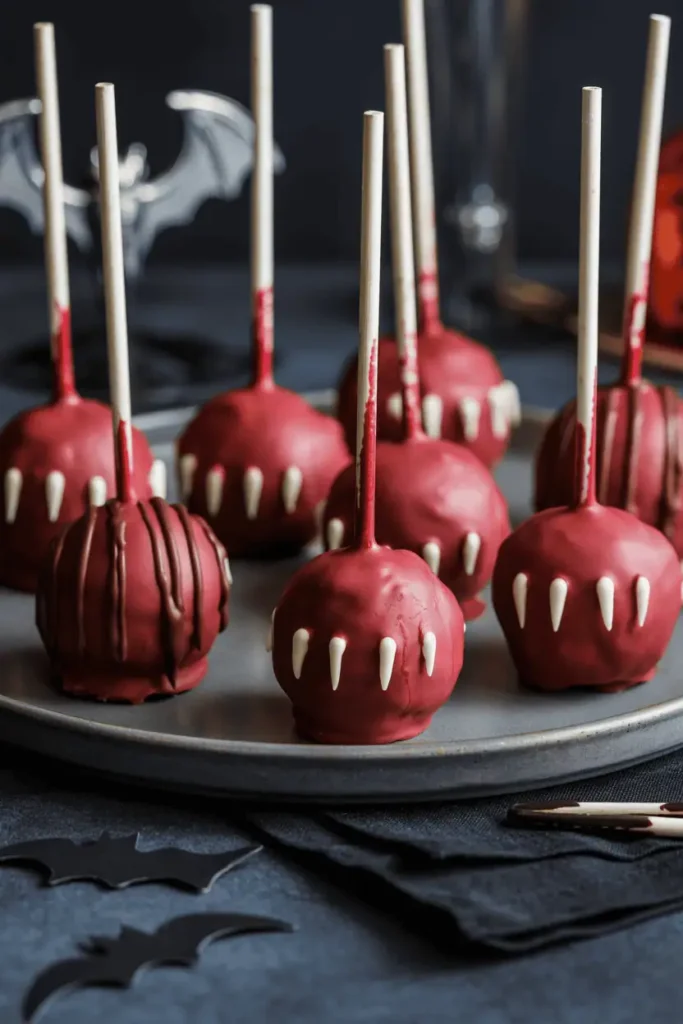
🩸 Vampire & Graveyard Vibes
- Vampire Bite: Dip in deep red, add two tiny “fang marks” using a toothpick dipped in red gel.
- Blood Drizzle: After a white or dark dip, flick thin lines of red melt for a spooky finish.
- Graveyard Pops: Roll dipped pops in crushed chocolate cookies for “dirt.”
- Tombstones: Press a mini cookie (like Milano slice) into the top and write “RIP” with black gel.
Serve on a tray sprinkled with cookie “soil” and candy bones for extra drama.
🕷️ Display & Party Tips
- Stand pops in a foam block wrapped with faux spiderwebs for a creepy-cute display.
- Wrap individually in cellophane bags + ribbon for trick-or-treat handouts.
- Label flavors with mini tags (Pumpkin, Mummy, Monster) so guests can pick their fave.
- Make ahead: Chill dipped pops 20 minutes to set; store covered in the fridge up to 5 days.
Pin this section for later—Halloween cake pops are a guaranteed crowd-pleaser.
Customizable Cake Pops (Pink, Rainbow, or Holiday-Ready!)
Ingredients
Equipment
Method
- Crumble the cake. Break the cooled cake into fine crumbs in a large bowl.
- Mix in the frosting. Add frosting and mix until the texture feels like thick dough.
- Roll into balls. Scoop and roll into 24 balls (about 2 inches each). Chill in the freezer for 20 minutes.
- Insert sticks. Melt ¼ cup of candy melts. Dip one end of each stick ½ inch into the candy, then insert into the center of each cake ball. Chill again for 20 minutes.
- Dip and decorate. Melt remaining candy melts. Dip each cake pop and gently tap off the excess. Add sprinkles or sanding sugar immediately, if using.
- Let them set. Refrigerate for 20 minutes until the coating is completely set.
Notes
- For best results, let the candy melts cool slightly before dipping to avoid cracks.
- Use a foam block to dry upright for a neat finish.
- Store in an airtight container in the fridge for up to 5 days.
Estimated Calories:
120 per cake popAn automated tool is used to calculate nutritional information. Accuracy not guaranteed.


