
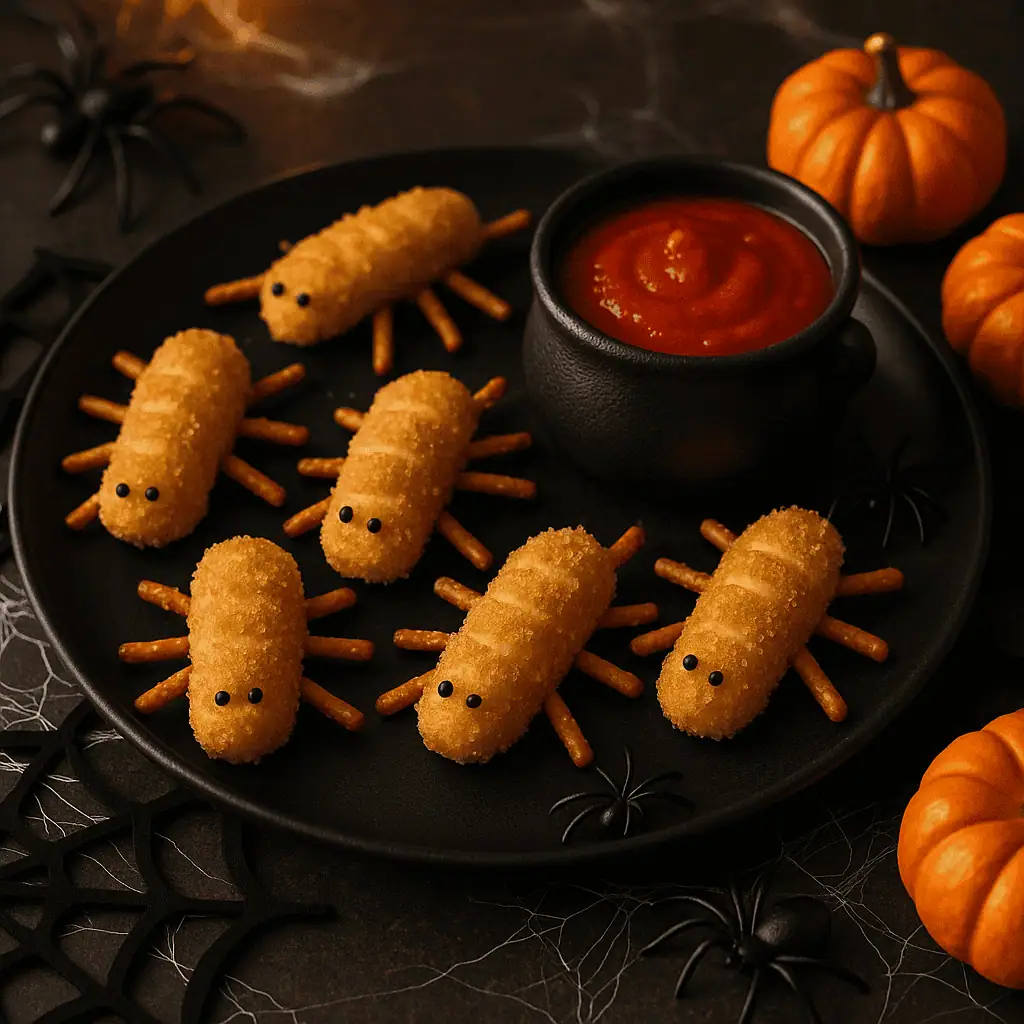
Air Fryer Creepy Crawly Mozzarella Sticks: A Tasty Twist
Get ready to turn ordinary cheese into spine-tingling Halloween treats that’ll make your guests squeal with delight! I’m excited to share this fun and easy method. It combines crispy perfection with spooky seasonal flair.
These frightfully delicious Halloween appetizers are perfect for adding scary fun to your party. The beauty of air fryer recipes is their simplicity. You get that golden, crunchy exterior without the mess of traditional frying!
Trust me, this mozzarella sticks recipe is super simple, even for beginner cooks. Your kids (and let’s be honest, the adults too!) will want more of these gooey, gloriously spooky treats.
We’ll cover everything you need to know to make these deliciously eerie appetizers. They look scary but taste amazing – the perfect combo for your Halloween celebration!
What Makes These Mozzarella Sticks “Creepy Crawly”
Turning cheese sticks into spooky snacks is all about creative presentation and simple tricks. We’re excited to share how we make mozzarella into spine-tingling spooky snacks. These snacks will amaze and delight your guests.
The magic comes from strategic surface scoring. We make segmented sections that look like real creepy crawlers. These cuts don’t change the cheese inside. They just add an authentic crawly appearance that makes people look twice!
- Textural coating elements that create “legs” or “antennae” effects
- Strategic breadcrumb placement for realistic segmentation
- Creative plating techniques that enhance the spooky factor
- Simple scoring methods anyone can master
Don’t worry about scaring your guests! These treats taste just like the mozzarella sticks everyone loves. The air fryer cooking method makes them crispy on the outside. But they keep that comforting cheese flavor inside.
The best part? All the “creepy” elements are just for show. Even the most squeamish eaters will enjoy these spooky snacks. They’re just deliciously disguised comfort food. We’re using clever presentation to create Halloween magic!
Essential Ingredients for Spooky Success
Let’s explore the key ingredients for turning cheese sticks into spooky treats. Great results come from quality ingredients, and these Halloween snacks are no different. Most of what you need is probably in your pantry already!
With just a few simple ingredients, we can make mozzarella the star of your Halloween party. It’s amazing how easy it is to achieve such impressive results.
Cheese Selection and Preparation
The right mozzarella is the base for perfect cheese sticks. I suggest using string cheese for easy prep. They’re already the right size and hold their shape well when air fried.
For cutting your own, get whole milk mozzarella from the deli. Cut it into 4-inch long, ½ inch thick sticks. Pro tip: Freezing the cheese sticks for 30 minutes before coating helps prevent melting.
Low-moisture mozzarella is best because it doesn’t release too much liquid when cooked. Avoid fresh mozzarella balls, as they have too much moisture for air frying.
Coating Components
You’ll need a three-station breading setup for crispy cheese sticks. Start with all-purpose flour seasoned with salt and pepper. This helps the egg wash stick better.
Next, use 2-3 beaten eggs for the middle station. Add a tablespoon of milk to make the eggs easier to work with. Seasoned breadcrumbs are the final step for that golden, crunchy exterior.
I love using panko breadcrumbs for extra crunch, but regular breadcrumbs work well too. Season your breadcrumbs with garlic powder, Italian seasoning, and paprika for great flavor.
“The secret to restaurant-quality cheese sticks at home is in the double-coating technique – it creates an extra barrier that keeps the cheese perfectly contained.”
Decorative Elements
Now, let’s add the magic! These simple additions turn regular appetizers into spooky Halloween treats that will impress your guests.
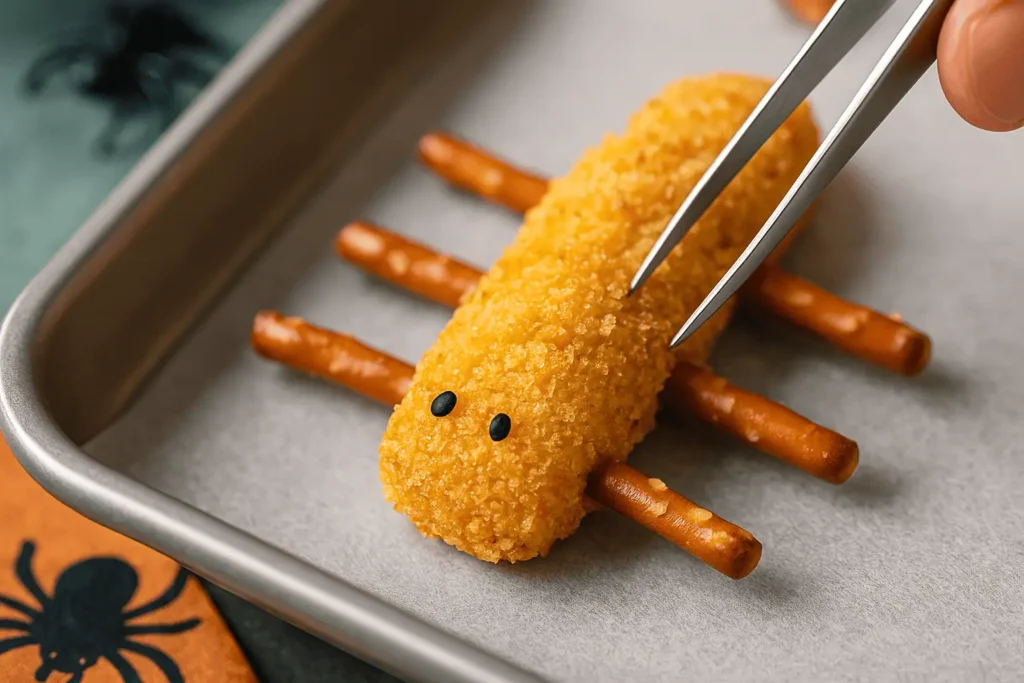
Pretzel sticks become creepy legs when broken into small pieces. You’ll need 6-8 pieces per cheese stick. Black sesame seeds make perfect little eyes – just two per stick creates an instantly recognizable bug appearance!
Fresh herbs like rosemary or thyme add texture and make your creations look more realistic. A few drops of food coloring in your breadcrumbs can create different colored “bugs” for variety.
Don’t forget about presentation! Black plates, spider web placemats, and dim lighting will make your creepy crawly cheese sticks the centerpiece of any Halloween gathering.
Air Fryer Equipment and Setup Requirements
Before we dive into making these incredible Halloween treats, let’s talk about the equipment that’ll make you successful! Having the right setup is absolutely key for creating those perfectly crispy mozzarella sticks that’ll wow your guests. Don’t worry if you’re new to air frying – I’m here to guide you through everything you need!
The beauty of these Halloween food ideas is that they work with most standard air fryers. Whether you have a basket-style or oven-style model, you can create amazing results. The key is understanding how your specific air fryer circulates heat and where those hot spots are located.
The secret to perfect air fryer cooking isn’t just the recipe – it’s knowing your equipment inside and out.
Choosing the Right Air Fryer
You’ll be thrilled to know that most air fryers on the market today can handle these spooky air fryer snacks beautifully! The size really depends on how many people you’re feeding. For family-sized batches, I recommend at least a 4-quart capacity.
Basket-style air fryers are fantastic for these treats because they provide excellent air circulation around each stick. The constant movement of hot air creates that perfect golden exterior we’re after. Oven-style air fryers work wonderfully too, if you’re making larger batches for parties!
Here’s what to consider when choosing your air fryer for these Halloween food ideas:
| Air Fryer Type | Best For | Capacity | Cooking Results |
|---|---|---|---|
| Basket-Style | Small batches, even browning | 2-6 quarts | Superior crispiness |
| Oven-Style | Large batches, multiple racks | 6-12 quarts | Consistent cooking |
| Toaster Oven Combo | Versatile cooking options | 4-8 quarts | Good all-around performance |
Essential Tools and Accessories
Having the right tools makes creating these crispy mozzarella masterpieces so much easier! You don’t need anything fancy – just a few key items that’ll help you achieve professional results every time.
Must-have tools include:
- Long-handled tongs for safe flipping
- Wire cooling rack for draining
- Parchment paper or air fryer liners
- Meat thermometer for checking doneness
- Small brush for oil application
I always keep my tongs nearby because they’re perfect for gently turning these delicate treats without breaking the coating. A wire cooling rack is essential for letting excess oil drain while keeping your air fryer snacks crispy!
The setup process is incredibly straightforward once you have everything organized. Your air fryer will quickly become your go-to appliance for creating these spooky delights that everyone will absolutely love!
Preparing Your Mozzarella Sticks for Transformation
Get ready to turn simple cheese sticks into Halloween appetizers! This is where the magic happens in your kitchen. You’ll transform ordinary ingredients into spooky treats that’ll wow your guests.
The preparation process is surprisingly simple but incredibly rewarding. I love this step because it’s where your air fryer recipes get that special Halloween twist! Don’t worry if you’re new to this – I’ll guide you through every detail.
Cutting and Shaping Techniques
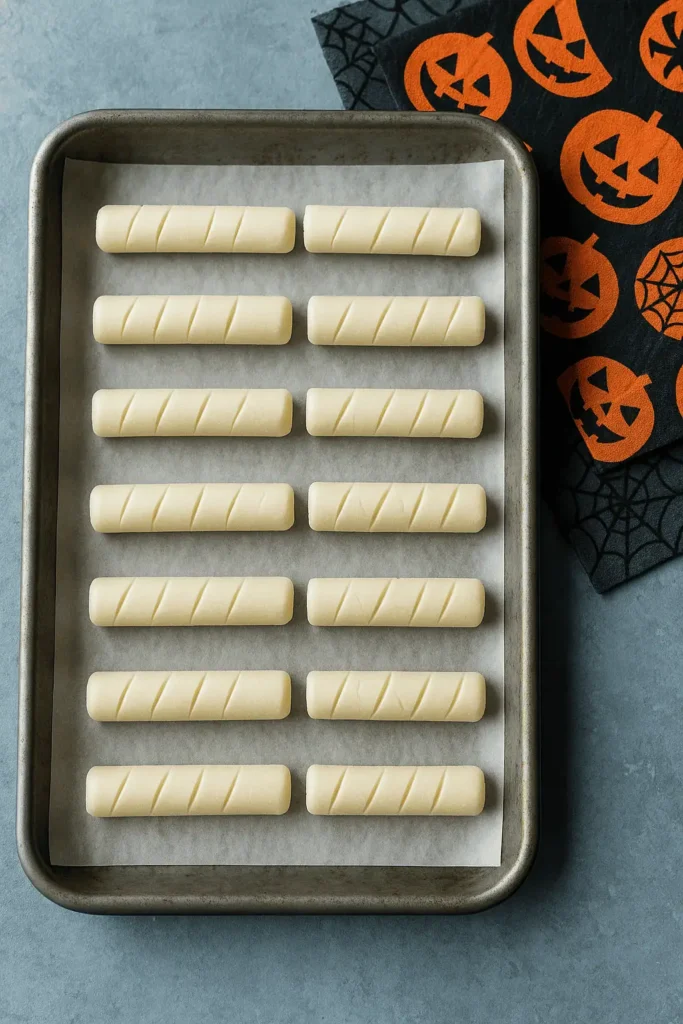
Start by making shallow diagonal cuts along each mozzarella stick. These cuts should be about 1/4 inch deep and spaced roughly 1/2 inch apart. This creates that segmented, insect-like appearance that makes your treats look authentically creepy!
Here’s the key technique I always use:
- Hold your knife at a 45-degree angle
- Make gentle, controlled cuts – don’t rush this step
- Keep cuts shallow enough that the cheese stays intact
- Create 4-6 segments per stick for the best visual effect
The diagonal pattern mimics natural insect segmentation perfectly. Your mozzarella sticks recipe will look like little caterpillars or worms! Practice on a few sticks first to get the hang of it.
Creating the Creepy Crawly Appearance
Now comes the fun decorating part! You’ll add pretzel stick pieces or thin vegetable strips to create legs and antennae. I recommend breaking pretzel sticks into 1-inch pieces for the legs.
Position these elements strategically:
- Insert pretzel pieces into the diagonal cuts you made earlier
- Place 2-3 pieces on each side for realistic-looking legs
- Add longer pieces at one end for antennae
- Press gently to ensure they stay put during cooking
The secret is gentle pressure when inserting decorative elements. You want them secure but not so tight that they crack the cheese. Your air fryer will do the rest of the work!
Remember, imperfection adds character to your creepy crawlies – real insects aren’t perfectly symmetrical either!
Take your time with this step. Each stick will have its own personality! Some might look like spiders, others like centipedes. That variety makes your Halloween appetizers even more entertaining for guests.
Step-by-Step Air Fryer Creepy Crawly Mozzarella Sticks Preparation
Let’s get started on making your creepy crawly mozzarella sticks! This is where all your prep work comes together. You’ll see these spooky snacks turn into the perfect Halloween party food. It’s so satisfying to watch everything come together!
Success comes from being organized and timing things right. Make sure each stick gets the perfect coating. Taking a few extra minutes here will make a big difference in your final results!
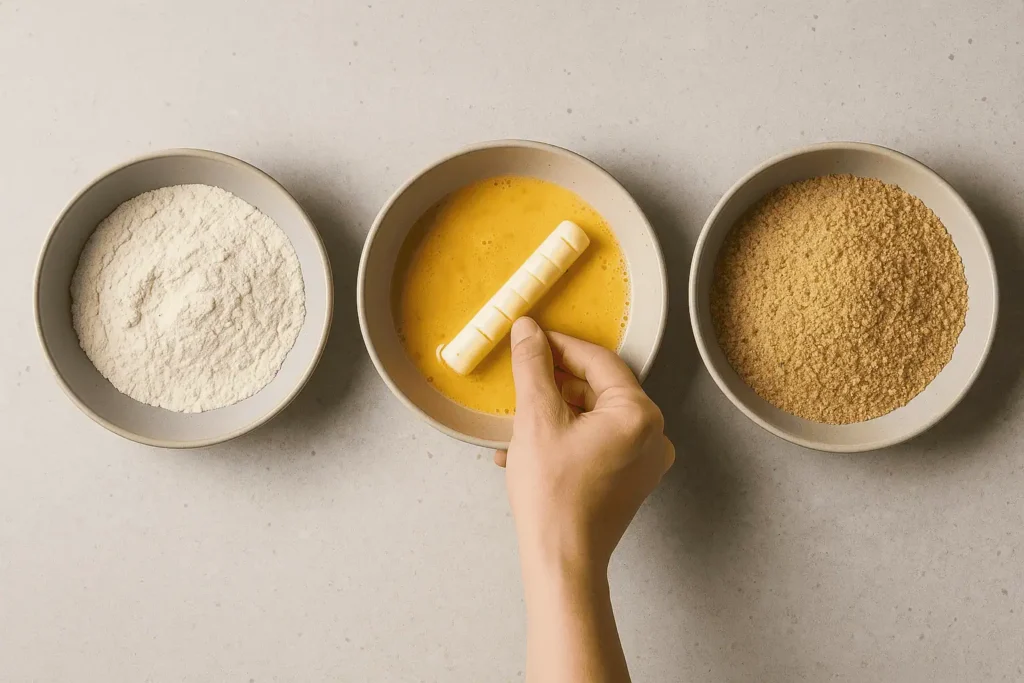
Setting Up Your Breading Station
Setting up your breading station is key for smooth air fryer cooking. Arrange three shallow dishes in a straight line on your counter. This setup makes the coating process flow naturally from left to right.
Fill the first dish with seasoned all-purpose flour. Add a pinch of garlic powder and paprika for extra flavor! The second dish gets your beaten eggs – I like to add a tablespoon of milk to make them easier to work with. The third dish holds your seasoned breadcrumbs mixed with any additional spices.
Place a clean plate at the end of your station for the finished sticks. Keep a damp towel nearby for wiping your hands between batches. This simple setup prevents mess and keeps everything organized!
The Three-Step Coating Process
Now for the magic coating process that creates that perfect crispy exterior! Work with one mozzarella stick at a time for the best results. This methodical approach prevents clumping and ensures even coverage.
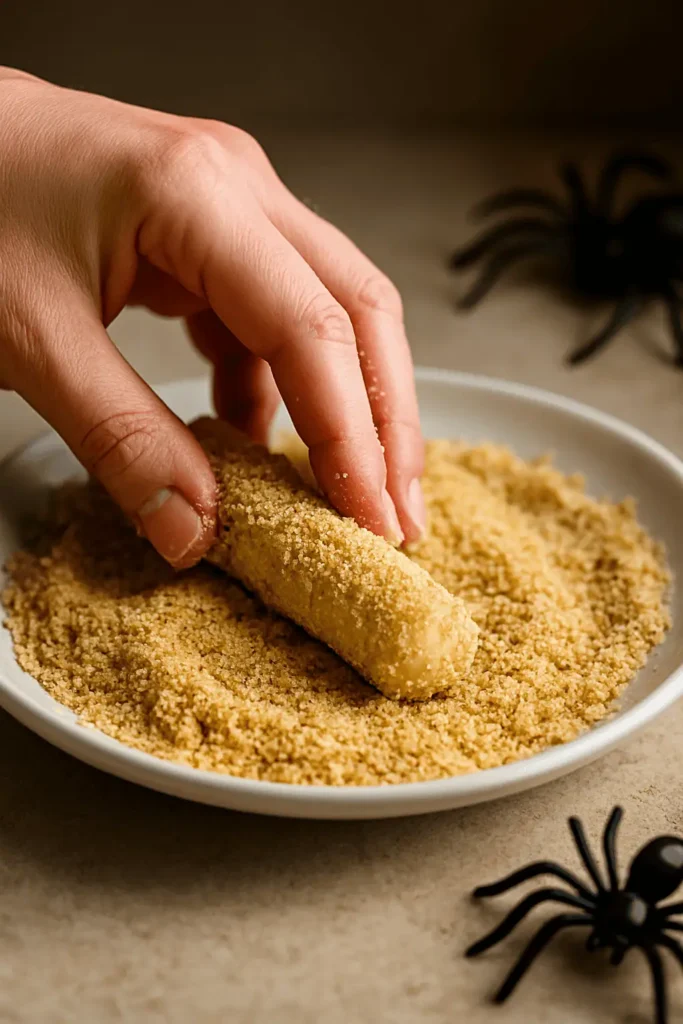
Start by rolling each stick in the seasoned flour, making sure to coat all sides completely. Shake off any excess flour – you want a light, even coating. Next, dip the floured stick into the beaten egg, letting any excess drip off.
Lastly, roll the stick in breadcrumbs, pressing gently to help them adhere. The coating should look thick and even all around. Place each completed stick on your prepared plate while you finish the batch.
| Coating Step | Ingredient | Technique | Key Tip |
|---|---|---|---|
| Step 1 | Seasoned Flour | Roll and coat evenly | Shake off excess |
| Step 2 | Beaten Eggs | Dip completely | Let excess drip off |
| Step 3 | Breadcrumbs | Roll and press gently | Ensure full coverage |
| Final Check | Completed Stick | Visual inspection | Look for even coating |
Adding Spooky Details
Now, your spooky snacks get their creepy crawly personality! Work quickly while the coating is slightly damp. This helps everything stick properly. I love getting creative with these finishing touches!
Gently press pretzel stick pieces into the sides to create “legs” for your crawly creatures. Break them into small pieces, about half an inch long. Insert them at slight angles to make them look more realistic and spooky.
Add sesame seeds or small pieces of black olives for “eyes” on one end. Press them gently into the coating so they won’t fall off during cooking. You can even use tiny pieces of red pepper for a more dramatic effect!
For extra Halloween flair, try adding small herb pieces like chives for “antennae” or create patterns with different colored breadcrumbs. The possibilities are endless, and kids absolutely love helping with this creative step!
Air Frying Techniques for Perfect Results
Now, let’s make your creepy crawly cheese sticks golden and crispy! I’ve spent a lot of time perfecting these methods. They ensure success every time. The secret to great Halloween treats is knowing your air fryer and following these steps.
Your air fryer is going to make these spooky snacks amazing! The hot air and right timing make the outside crispy and the cheese inside gooey. Once you get the hang of it, you’ll make these party appetizers for every event!
Temperature and Timing Guidelines
Set your air fryer to 375°F. This is the perfect temperature I’ve found. It gives you a golden crust without overcooking the cheese. Lower temperatures won’t work, and higher ones might burn the coating before the cheese melts.
Cook your cheese sticks for 6-8 minutes total. But remember, every air fryer is different! Start checking at 6 minutes for that golden-brown color. The coating should be crispy and slightly puffed, with a hint of cheese peeking through.
If your first batch takes longer, don’t worry. You’re getting to know your air fryer! The smell of toasted breadcrumbs and melted cheese is a great sign you’re almost done.
Flipping and Monitoring Process
Flipping is key to keeping the creepy details intact! At 3-4 minutes, check the bottom side for a light golden color. Use tongs or a spatula to gently turn each piece, being careful not to mess up the decorations.
Flipping needs patience and care. Slide your spatula under each piece slowly, supporting it as you turn it. This keeps the decorations in place. Remember, these snacks are delicate at this stage!
Keep an eye on the color during the last 2-3 minutes. You want an even golden-brown on all sides. If some spots are browning faster, gently rotate the pieces or move them to different areas of the basket.
The perfect doneness is when the coating is crispy and golden, with a bit of cheese visible at the edges. That’s when you know the cheese is melted and gooey. Your Halloween treats are now ready to impress!
Troubleshooting Common Air Fryer Issues
Every air fryer chef faces challenges, like making crispy mozzarella treats. I’ve seen cheese spill out and coatings not brown evenly. But, these problems have easy fixes to make perfect air fryer snacks soon!
Don’t worry if your first batch doesn’t turn out right. Even pros need practice. The trick is to figure out what went wrong and how to fix it next time.
Preventing Cheese Leakage
Cheese leakage is the biggest problem with crispy mozzarella sticks. Proper sealing is key. Set up your breading station with flour, eggs, and breadcrumbs in separate bowls.
Chilling time is your secret weapon. Freeze your coated mozzarella sticks for 30 minutes before air frying. This sets the cheese and coating.
Focus on the ends of your sticks. Press the breadcrumb coating firmly there. If the breading looks thin, add more.
The colder your cheese, the less likely it is to leak during cooking. I always keep my mozzarella sticks in the freezer until I’m ready to cook them.
Double-coating helps too. After the first coating, rest the sticks for 10 minutes. Then, dip them in egg and breadcrumbs again. This creates a stronger barrier.
Achieving Even Browning
Getting a perfect golden color on your Halloween food ideas can be hard. It’s all about knowing your air fryer’s hot spots and adjusting. Most air fryers have areas that cook faster.
Always flip your air fryer snacks halfway through cooking. Use tongs to turn each stick gently. This ensures both sides get equal heat.
If some sticks brown faster, don’t worry. Just rearrange them in the basket. Move the darker ones to cooler spots and the lighter ones to the center.
Temperature control is key for even browning. If your air fryer is too hot, lower the temperature by 25 degrees and cook a bit longer. For cooler models, increase the temperature but watch for burning.
For decorations like pretzel pieces or extra breadcrumbs, brush them with oil before cooking. This helps them brown evenly and prevents them from looking pale.
Creative Serving and Presentation Ideas
Now, let’s make your mozzarella sticks into amazing Halloween appetizers that will wow your guests! The way you present them can turn simple air fryer recipes into unforgettable party highlights.
Adding a few creative touches can change the whole dining experience. Your guests will be snapping photos before they even try them!
Halloween-Themed Plating
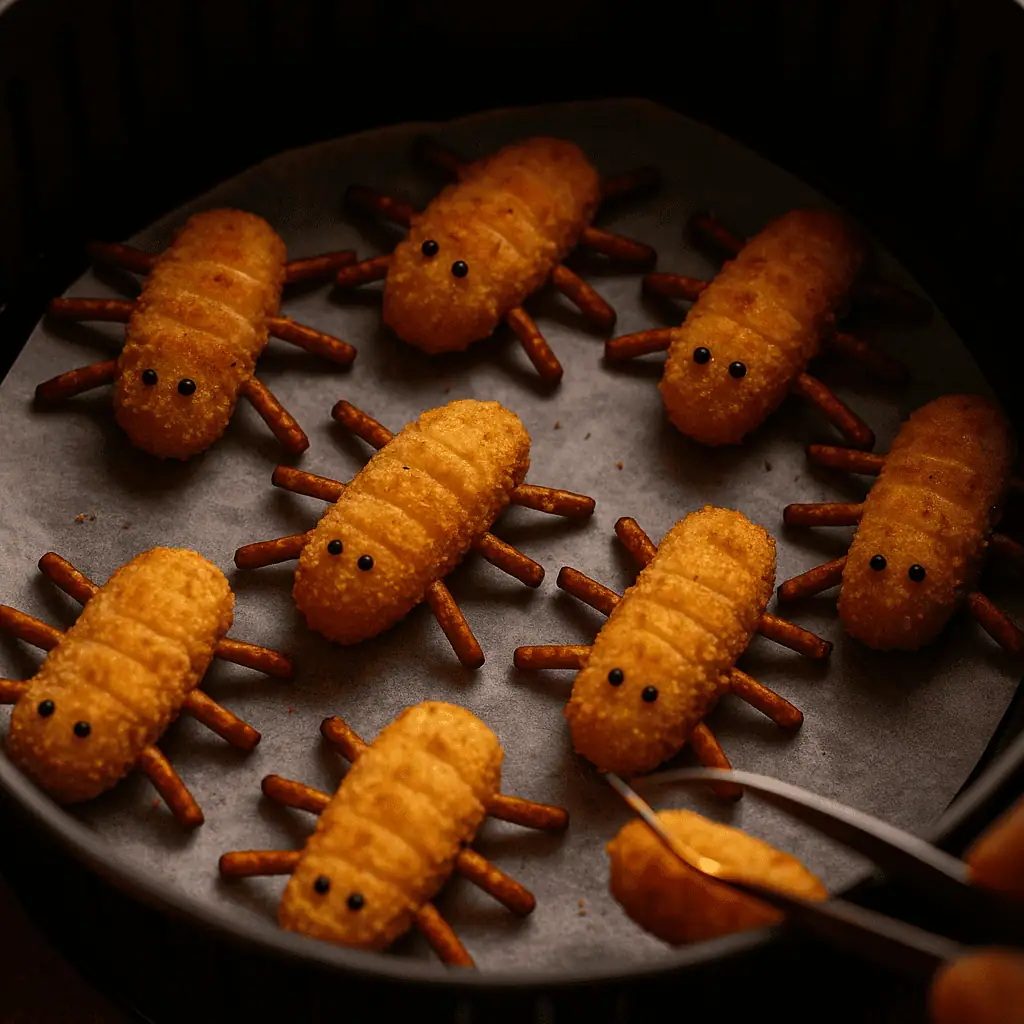
Start with the right serving surface. Black plates or dark wooden boards are perfect for your golden mozzarella sticks. The contrast is striking and sets the spooky mood.
One trick I love is making “spider webs” with melted mozzarella cheese. Just melt some cheese, drizzle it in web patterns, and let it cool. Then, place your creepy crawly sticks on top.
For a graveyard scene, crush chocolate sandwich cookies to make “dirt.” Sprinkle it around your serving area. Let your mozzarella sticks look like they’re crawling out of the ground. Add pretzel stick “tombstones” for more drama!
Arrange your sticks in a circle with their “legs” out. It looks like a spider and is both creepy and tempting. Add black olives as “spider eggs” for a real spider look.
Spooky Dipping Sauces
Regular marinara is fine, but spooky sauces elevate your mozzarella sticks recipe! My “blood” sauce is made from roasted red peppers, tomato sauce, and balsamic vinegar. It’s a deep red color that looks sinister.
For a mysterious sauce, make black ranch using activated charcoal powder. Just a little bit makes regular ranch look otherworldly but tastes amazing!
Put your sauces in small cauldrons or black bowls. Add a few drops of olive oil on top for a witchy look. Label them with spooky names like “Vampire’s Blood” or “Witch’s Brew.”
If you’re feeling bold, add food-safe dry ice to your sauce bowls for a smoking effect. Just be careful and never put it in food!
Variations and Flavor Twists
Ready to spice up your spooky snacks with new twists? I love trying out different flavors because each one adds a unique touch to your Halloween party food! Mastering air fryer cooking lets you easily change recipes for any event.
These new takes will keep your guests curious and eager for more. You can tailor each batch to fit different tastes or dietary needs!
Different Cheese Options
Pepper jack cheese brings a spicy kick that’s exciting. It pairs well with the crispy coating, making a great flavor mix. Cut pepper jack a bit thicker than mozzarella because it melts differently.
Sharp cheddar offers a bold, tangy taste that’s great for cheese fans. Its golden color adds to the spooky autumn feel! Aged cheddar works well because it keeps its shape better when air fried.
For a fancy touch, try brie cheese! It needs special care – freeze it for 30 minutes before cutting, and work fast when breading. The creamy, buttery taste is amazing for adult Halloween parties.
The secret to great cheese variations is knowing how each cheese melts and adjusting your method.
Alternative Coating Ideas
Crushed Halloween-colored cereals make a fun and festive coating! Orange and black cereals like Cocoa Puffs or Fruity Pebbles add color and crunch. Mix them with regular breadcrumbs for the best texture.
Seasoned cornmeal gives your spooky snacks a Southern twist with great crunch. Add paprika, garlic powder, and a bit of cayenne for extra flavor. This coating makes your snacks look like they have golden “scales”!
Crushed pretzels with herbs create a “moldy” look that’s tasty. The salty pretzel crunch with dried oregano and basil is earthy and savory, looking spooky.
My top “dirt” effect uses cocoa powder, chocolate cookie crumbs, and breadcrumbs. It makes your mozzarella sticks look like they came from the garden! The chocolate flavor is a nice surprise.
Remember, when using different coatings in the air fryer, adjust the temperature. Lighter coatings might brown quickly, so watch closely during the last minutes!
Storage and Reheating Tips
Don’t let your delicious creepy crawly cheese sticks go to waste after your Halloween party! Proper storage is key to keeping them fresh. I’ll show you how to store your leftover treats and how to make them crispy again.
Keeping the coating from getting soggy and the cheese from drying out is the secret. With the right storage, you can enjoy these treats for days after your party!
Keeping Your Treats Fresh
For short-term storage, let your cheese sticks cool completely. This prevents the coating from getting soggy. Place them in a single layer on a paper towel-lined container.
Here’s my foolproof storage method:
- Line an airtight container with paper towels
- Place Halloween treats in a single layer
- Add another paper towel on top
- Store in the refrigerator for up to 3 days
For longer storage, freeze your party appetizers! Wrap each one in plastic wrap, then in a freezer bag. They’ll stay fresh for up to 2 months.
Pro tip: Label your containers with the date so you know exactly when you made them!
Bringing Back That Perfect Crispiness
Your air fryer is absolutely perfect for reheating these treats! It brings back that amazing crispy exterior without overcooking the cheese inside. Here’s exactly how to do it:
For refrigerated cheese sticks, preheat your air fryer to 350°F. Place them in the basket without overlapping and heat for 2-3 minutes. Check them halfway through and give the basket a gentle shake.
Frozen treats need a bit more time. Heat them at 350°F for 4-5 minutes, flipping once halfway through. The coating should be golden and crispy when they’re ready!
If any decorative elements have shifted during storage, you can easily refresh them. Simply brush on a tiny bit of beaten egg and reapply your spooky details before reheating.
Never use the microwave for reheating – it will make your coating soggy and ruin that perfect texture we worked so hard to achieve!
Don’t forget about leftover coating mixture! Store it in the refrigerator for up to a week and use it to make fresh batches or coat other Halloween treats. Waste not, want not!
Creepy Crawly Mozzarella Sticks
Spooky Air Fryer Halloween Treats
Ingredients
- 12 string cheese sticks (or cut mozzarella)
- 1/2 cup all-purpose flour
- 2 large eggs + 1 tbsp milk
- 1 1/2 cups seasoned breadcrumbs (or panko)
- 1/2 tsp garlic powder
- 1/2 tsp paprika
- Salt and pepper to taste
- Broken pretzel sticks (for legs)
- Black sesame seeds or olive bits (for eyes)
- Optional: herbs or food coloring for effect
Instructions
- Freeze cheese sticks for 30 minutes for best results.
- Make shallow diagonal cuts to create segmented insect effect.
- Set up breading stations: flour, egg wash, and breadcrumbs.
- Coat each stick in flour, then egg, then breadcrumbs. Repeat for double coating.
- Add broken pretzel legs and sesame seed eyes by gently pressing into the surface.
- Freeze again for 15 minutes to help decorations stick.
- Preheat air fryer to 375°F. Cook in batches for 6–8 minutes, flipping halfway through.
- Serve warm with spooky dips like “bloody” marinara!
Conclusion
Creating these air fryer snacks is a joy in any kitchen! You’ve learned how to pick the best cheese and get that crispy mozzarella we all love.
These creepy crawly treats show that Halloween food can be simple yet amazing. Your family and friends will be wowed by how tasty and spooky they look!
This recipe is a great way to bring people together. Kids have fun making the crawly legs, and adults love the melted cheese. The air fryer makes it easy, unlike traditional frying.
Feel free to make this recipe your own! Try different cheeses or coatings. Each batch will be unique, making cooking fun.
These crispy mozzarella sticks are perfect for Halloween parties or just a fun surprise. You can enjoy them all year by changing how you present them.
When you serve these treats, you’ll see smiles everywhere. Your kitchen adventures are just starting, and I’m excited to see what you’ll discover next!

